Get Started with Agora Chat
Instant messaging connects people wherever they are and allows them to communicate with others in real time. The Agora Chat SDK enables you to embed real-time messaging in any app, on any device, anywhere.
This page shows a sample code to add peer-to-peer messaging into an app by using the Agora Chat SDK for Flutter.
Understand the tech
The following figure shows the workflow of how clients send and receive peer-to-peer messages.
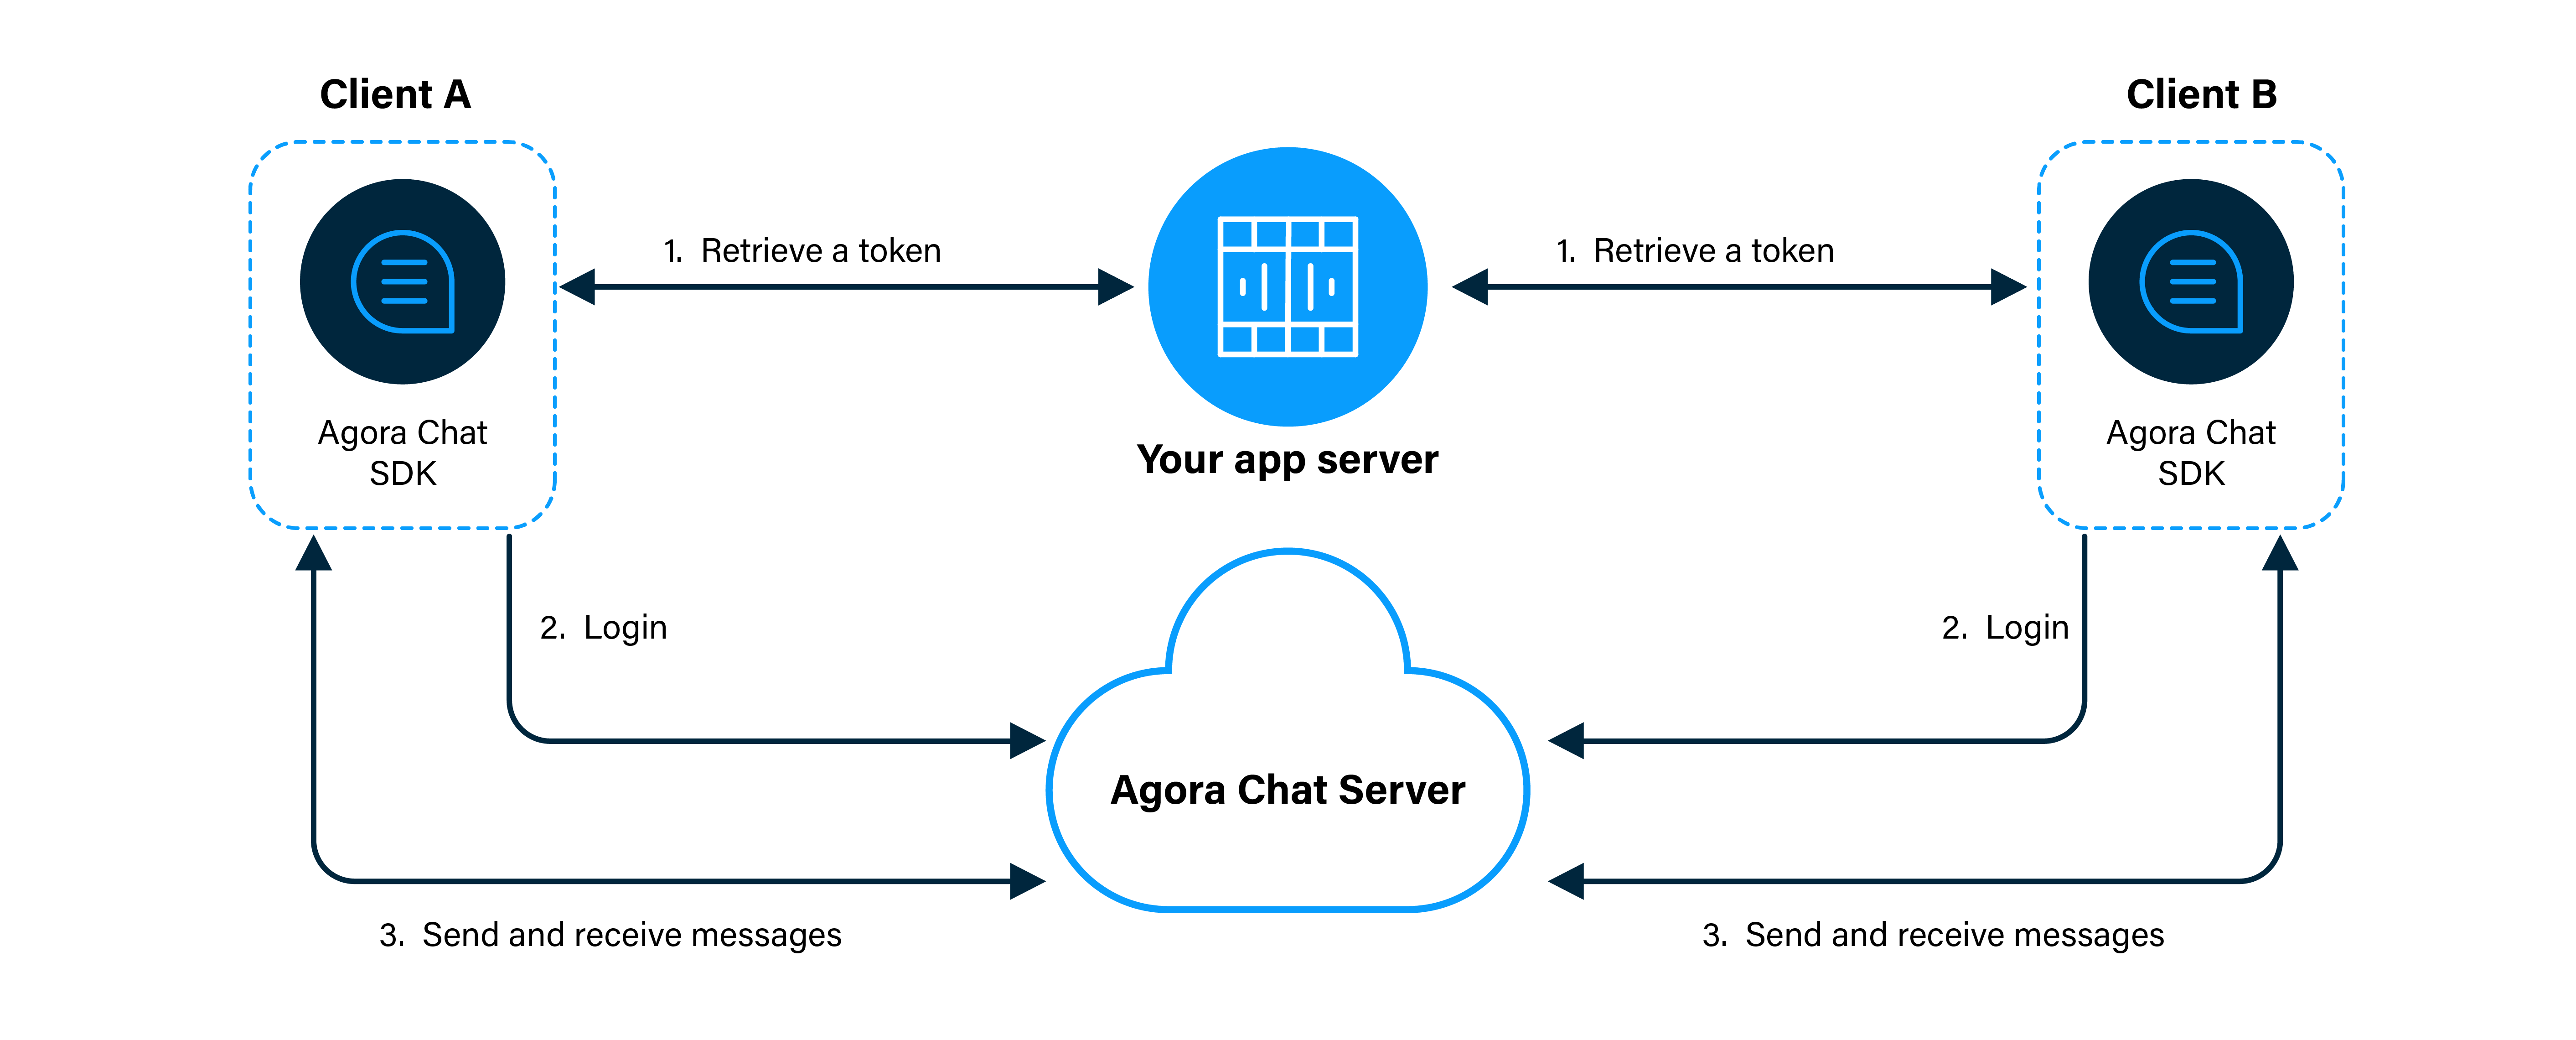
As shown in the figure, the workflow of peer-to-peer messaging is as follows:
- Clients retrieve a token from your app server.
- Client A and Client B log in to Agora Chat.
- Client A sends a message to Client B. The message is sent to the Agora Chat server and the server delivers the message to Client B. When Client B receives the message, the SDK triggers an event. Client B listens for the event and gets the message.
Prerequisites
If your target platform is iOS, your development environment must meet the following requirements:
- Flutter 3.3.0 or later
- Dart 3.3.0 or later
- macOS
- Xcode 12.4 or later with Xcode Command Line Tools
- CocoaPods
- An iOS simulator or a real iOS device running iOS 12.0 or later
If your target platform is Android, your development environment must meet the following requirements:
- Flutter 3.3.0 or later
- Dart 3.3.0 or later
- Android Studio 4.0 or later with JDK 1.8 or later
- An Android simulator or a real Android device running Android SDK API level 21 or later
flutter doctor to check whether both the development environment and the deployment environment are correct.Token generation
This section describes how to register a user at Agora Console and generate a temporary token.
Register a user
To generate a user ID, do the following:
- On the Project Management page, click Config for the project you want to use.
- On the Edit Project page, click Config next to Chat below Features.
- In the left-navigation pane, select Operation Management > User and click Create User.
- In the Create User dialog box, fill in the User ID, Nickname, and Password, and click Save to create a user.
Generate a user token
To ensure communication security, Agora recommends using tokens to authenticate users logging in to an Agora Chat system.
For testing purposes, Agora Console supports generating Agora chat tokens. To generate an Agora chat token, do the following:
- On the Project Management page, click Config for the project you want to use.
- On the Edit Project page, click Config next to Chat below Features.
- In the Data Center section of the Application Information page, enter the user ID in the Chat User Temp Token box and click Generate to generate a token with user privileges.
Project setup
1. Create a Flutter project
Open a terminal, enter a directory in which you want to create a Flutter project, and run the following command to create a project folder named quick_start:
flutter create quick_start
2. Set up the project
Android setup
- Set the minimum Android SDK version to 21.
For projects that use Groovy, update the quick_start/android/app/build.gradle file as follows:
android {
    defaultConfig {
        minSdkVersion 21
    }
}
For projects that use Kotlin DSL, update the quick_start/android/app/build.gradle.kts file as follows:
android {
    defaultConfig {
        minSdk = 21
    }
}
- In the
quick_start/android/app/proguard-rules.profile, add the following lines to prevent code obfuscation:
-keep class com.hyphenate.** {*;}
-dontwarn  com.hyphenate.**
iOS setup
- Open the
quick_start/ios/Runner.xcodeprojfile in Xcode, and select TARGETS > Runner in the left sidebar. In the Deployment Info section under the General tab, set the minimum iOS version to iOS 12.0.
3. Integrate the Agora Chat SDK
Open a terminal, enter the quick_start directory, and run the following command to add the agora_chat_sdk dependency:
flutter pub add agora_chat_sdk
flutter pub get
Implement peer-to-peer messaging
At the top lines of the quick_start/lib/main.dart file, add the following to import packages:
import 'package:flutter/material.dart';
import 'package:agora_chat_sdk/agora_chat_sdk.dart';

class AgoraChatConfig {
  static const String appKey = "<#Your app key#>";
  static const String userId = "<#Your created user#>";
  static const String agoraToken = "<#User Token#>";
}
Replace the lines of the _MyHomePageState class with the following:
class _MyHomePageState extends State<MyHomePage> {

  ScrollController scrollController = ScrollController();
  String? _messageContent, _chatId;
  final List<String> _logText = [];

  @override
  void initState() {
    super.initState();
    _initSDK();
    _addChatListener();
  }
  @override
  Widget build(BuildContext context) {
    return Scaffold(
      appBar: AppBar(
        title: Text(widget.title),
      ),
      body: Container(
        padding: const EdgeInsets.only(left: 10, right: 10),
        child: Column(
          crossAxisAlignment: CrossAxisAlignment.stretch,
          mainAxisSize: MainAxisSize.max,
          children: [
            const SizedBox(height: 10),
            const Text("login userId: ${AgoraChatConfig.userId}"),
            const Text("agoraToken: ${AgoraChatConfig.agoraToken}"),
            const SizedBox(height: 10),
            Row(
              mainAxisAlignment: MainAxisAlignment.spaceEvenly,
              children: [
                Expanded(
                  flex: 1,
                  child: TextButton(
                    onPressed: _signIn,
                    child: const Text("SIGN IN"),
                    style: ButtonStyle(
                      foregroundColor: WidgetStateProperty.all(Colors.white),
                      backgroundColor:
                          WidgetStateProperty.all(Colors.lightBlue),
                    ),
                  ),
                ),
                const SizedBox(width: 10),
                Expanded(
                  child: TextButton(
                    onPressed: _signOut,
                    child: const Text("SIGN OUT"),
                    style: ButtonStyle(
                      foregroundColor: WidgetStateProperty.all(Colors.white),
                      backgroundColor:
                          WidgetStateProperty.all(Colors.lightBlue),
                    ),
                  ),
                ),
              ],
            ),
            const SizedBox(height: 10),
            TextField(
              decoration: const InputDecoration(
                hintText: "Enter recipient's userId",
              ),
              onChanged: (chatId) => _chatId = chatId,
            ),
            TextField(
              decoration: const InputDecoration(
                hintText: "Enter message",
              ),
              onChanged: (msg) => _messageContent = msg,
            ),
            const SizedBox(height: 10),
            TextButton(
              onPressed: _sendMessage,
              child: const Text("SEND TEXT"),
              style: ButtonStyle(
                foregroundColor: WidgetStateProperty.all(Colors.white),
                backgroundColor: WidgetStateProperty.all(Colors.lightBlue),
              ),
            ),
            Flexible(
              child: ListView.builder(
                controller: scrollController,
                itemBuilder: (_, index) {
                  return Text(_logText[index]);
                },
                itemCount: _logText.length,
              ),
            ),
          ],
        ),
      ),
    );
  }

  void _initSDK() async {
  }
  void _addChatListener() {
  }
  void _signIn() async {
  }
  void _signOut() async {
  }
  void _sendMessage() async {
  }
  void _addLogToConsole(String log) {
    _logText.add(_timeString + ": " + log);
    setState(() {
      scrollController.jumpTo(scrollController.position.maxScrollExtent);
    });
  }
  String get _timeString {
    return DateTime.now().toString().split(".").first;
  }
}
1. Initialize the SDK
In the _initSDK method, add the following to initialize the SDK:
  void _initSDK() async {
    ChatOptions options = ChatOptions.withAppKey(
      AgoraChatConfig.appKey,
      autoLogin: false,
    );
    await ChatClient.getInstance.init(options);
    await ChatClient.getInstance.startCallback();
  }
If you use an App ID instead of an App Key, initialize the SDK with ChatOptions.withAppId:
    ChatOptions options = ChatOptions.withAppId(
      "<#Your app id#>",
      autoLogin: false,
    );
2. Log in to an account
In the _signIn method, add the following to add the login logic:
    void _signIn() async {
    try {
      await ChatClient.getInstance.loginWithToken(
        AgoraChatConfig.userId,
        AgoraChatConfig.agoraToken,
      );
      _addLogToConsole("login succeed, userId: ${AgoraChatConfig.userId}");
    } on ChatError catch (e) {
      _addLogToConsole("login failed, code: ${e.code}, desc: ${e.description}");
    }
  }
3. Log out of an account
In the _signOut method, add the following to add the logout logic:
  void _signOut() async {
    try {
      await ChatClient.getInstance.logout(true);
      _addLogToConsole("sign out succeed");
    } on ChatError catch (e) {
      _addLogToConsole(
          "sign out failed, code: ${e.code}, desc: ${e.description}");
    }
  }
4. Send messages
In the _sendMessage method, add the following to add the creating and sending logics for messages:
  void _sendMessage() async {
    if (_chatId == null || _messageContent == null) {
      _addLogToConsole("single chat id or message content is null");
      return;
    }

    var msg = ChatMessage.createTxtSendMessage(
      targetId: _chatId!,
      content: _messageContent!,
    );

    ChatClient.getInstance.chatManager.sendMessage(msg);
  }
5. Receive messages
- Add the following handle event in your class:
  void onMessagesReceived(List<ChatMessage> messages) {
    for (var msg in messages) {
      switch (msg.body.type) {
        case MessageType.TXT:
          {
            ChatTextMessageBody body = msg.body as ChatTextMessageBody;
            _addLogToConsole(
              "receive text message: ${body.content}, from: ${msg.from}",
            );
          }
          break;
        case MessageType.IMAGE:
          {
            _addLogToConsole(
              "receive image message, from: ${msg.from}",
            );
          }
          break;
        case MessageType.VIDEO:
          {
            _addLogToConsole(
              "receive video message, from: ${msg.from}",
            );
          }
          break;
        case MessageType.LOCATION:
          {
            _addLogToConsole(
              "receive location message, from: ${msg.from}",
            );
          }
          break;
        case MessageType.VOICE:
          {
            _addLogToConsole(
              "receive voice message, from: ${msg.from}",
            );
          }
          break;
        case MessageType.FILE:
          {
            _addLogToConsole(
              "receive file message, from: ${msg.from}",
            );
          }
          break;
        case MessageType.CUSTOM:
          {
            _addLogToConsole(
              "receive custom message, from: ${msg.from}",
            );
          }
          break;
        case MessageType.CMD:
          {
            // Receiving command messages does not trigger the `onMessagesReceived` event, but triggers the `onCmdMessagesReceived` event instead.
          }
          break;
      }
    }
  }
- In the
_addChatListenermethod, add the following to add the chat event handler:
  void _addChatListener() {
    ChatClient.getInstance.chatManager.addMessageEvent(
        "UNIQUE_HANDLER_ID",
        ChatMessageEvent(
          onSuccess: (msgId, msg) {
            _addLogToConsole("send message succeed");
          },
          onProgress: (msgId, progress) {
            _addLogToConsole("send message progress: $progress");
          },
          onError: (msgId, msg, error) {
            _addLogToConsole(
              "send message failed, code: ${error.code}, desc: ${error.description}",
            );
          },
        ));

    ChatClient.getInstance.chatManager.addEventHandler(
      "UNIQUE_HANDLER_ID",
      ChatEventHandler(onMessagesReceived: onMessagesReceived),
    );
  }
- Under the
initStatemethod, add thedisposemethod to remove the chat event handler, as shown in the following:
  @override
  void dispose() {
    ChatClient.getInstance.chatManager.removeMessageEvent("UNIQUE_HANDLER_ID");
    ChatClient.getInstance.chatManager.removeEventHandler("UNIQUE_HANDLER_ID");
    super.dispose();
  }
Run and test the project
Select the device to run the project, and run the following command in the quick_start directory:
flutter run
Take an Android device as an example. If the sample project runs properly, the app starts and shows the quick start user interface.
In the user interface, perform the following operations to test the project:
-
Log in Change the information in
AgoraChatConfigto your appKey and userId, agoraToken. Click theSIGN INbutton. -
Send a message Fill in the userId of the receiver in the
Enter recipient's user Idbox, type in the message ("hello") to send in theEnter messagebox, and click SEND TEXT to send the message. -
Log out Click SIGN OUT to log out of the app.
-
Receive the message After signing out, change
AgoraChatConfiguserId and agoraToken, and receive the message "hello" sent in step 2.
Next steps
For demonstration purposes, Agora Chat provides an app server that enables you to quickly retrieve a token using the App Key given in this guide. In a production context, the best practice is for you to deploy your own token server, use your own App Key to generate a token, and retrieve the token on the client side to log in to the Agora Chat service. To see how to implement a server that generates and serves tokens on request, see Generate a User Token.